You know that smell. The one coming from your kitchen bin on day three, when the bag is only half full but the vegetable peels have already started their own weather system. I ignored it for years. Then I started weighing my trash, and the number genuinely annoyed me: roughly 40% of what I was hauling to the curb every week was food scraps and yard clippings that never needed to leave my property at all.
So I built a compost pile. Then I built four more, because the first three failed. This guide is what I wish someone had handed me at the start, including the parts nobody puts in the cheerful diagrams.
Key Takeaways
- You need browns, greens, water and air — in roughly 2 to 3 parts browns to 1 part greens by volume.
- If it smells bad, it is too wet or too green. Add browns. That is almost always the whole fix.
- A bin that is 3 feet across works better than any expensive tumbler. Volume creates heat.
- Most beginners fail in the first month, then succeed on the second attempt with the same materials.
- You can compost in an apartment, but the method changes completely — worms or bokashi, not a pile.
- Finished compost takes 2 to 6 months in a cold pile and as little as 3 weeks in a hot one.
Composting at home: a beginner's guide to the one ratio that matters
Every composting guide online tells you to layer "browns" and "greens." Almost none of them tell you what happens when you get it wrong, which is why so many people quit in week six.
Here is the mechanism. Browns are carbon — dry leaves, cardboard, straw, shredded paper, sawdust from untreated wood. Greens are nitrogen — kitchen scraps, grass clippings, coffee grounds, fresh plant trimmings. The microorganisms doing the actual work need both, and they need them in a specific proportion. Too much green and you get anaerobic bacteria, which produce the rotten-egg smell and the slime. Too much brown and nothing happens for eight months.
The ratio in practice, not in theory
Forget weighing things. Nobody does that after the first week. Use volume instead: two to three handfuls of browns for every one handful of greens. That is it. That is the whole trick.
I kept a mental score for my first pile and got it badly wrong — I was running maybe 1:3 browns to greens, and by day ten the thing smelled like a swamp that had opinions. I dumped in two bags of shredded Amazon boxes, turned it once, and the smell was gone in 48 hours. That single correction taught me more than a month of reading.
What actually goes in the bin
You will find endless lists. Mine is shorter and split by what causes problems.
- Always fine: fruit and vegetable scraps, coffee grounds and filters, tea bags (check for plastic mesh), eggshells, dead leaves, grass clippings in thin layers, shredded plain cardboard, newspaper.
- Fine in small amounts: citrus peels (they break down, they just take longer), onion and garlic, bread, cooked pasta without sauce.
- Skip it: meat, fish, dairy, bones, oily leftovers, pet waste, anything with pesticide residue, and — this one catches people — compostable PLA plastics from takeout containers. They need industrial heat to break down and will sit in your pile intact for years. I tested one. It was still recognizably a fork 14 months later.
Compost bin choices: what I actually recommend
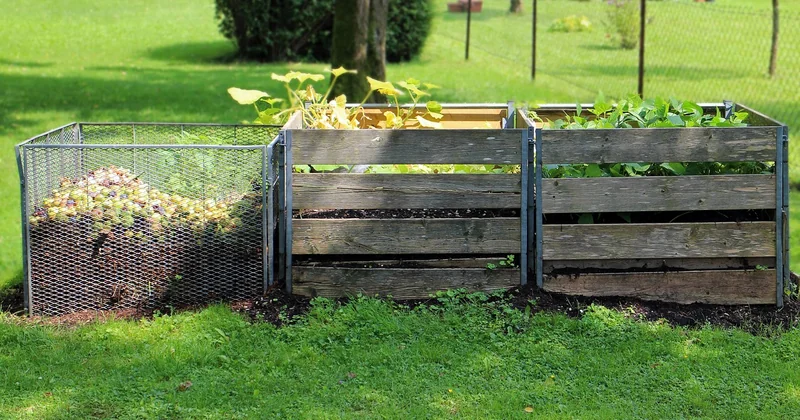
You have four realistic options, and the honest answer is that the cheapest one usually outperforms the expensive ones.
| Method | Cost | Time to finished compost | Best for | Main drawback |
|---|---|---|---|---|
| Open pile on the ground | Free | 4–12 months | Houses with yard space | Looks untidy, animals can raid it |
| Wire or pallet bin | €0–40 | 2–6 months | Most beginners | Needs turning for speed |
| Tumbling barrel | €80–250 | 3–8 weeks | Small yards, fast batches | Dries out fast, holds little |
| Worm bin (vermicomposting) | €40–120 | 2–4 months | Apartments, balconies | Worms die if you let it freeze or cook |
Why I stopped using a tumbler
The tumbler was my second purchase and my biggest mistake. It worked beautifully for about five weeks, then dried out because the black plastic cooked the contents every sunny afternoon. Dry compost stalls. I was adding water twice a week just to keep it alive, which defeated the point of a low-effort system.
A three-foot-wide wire bin sitting on bare soil did everything the tumbler promised and cost me nothing but an afternoon with zip ties and an old roll of fencing. The soil contact matters more than any feature: it lets worms and beneficial fungi walk in on their own. That is why I now tell people to start with the free option, not the shiny one.
How to make compost at home with kitchen waste
Kitchen scraps are the hardest input to manage, because they are wet, dense, and arrive daily in small quantities. Get this part right and the rest is easy.

The collection habit that changed everything
I keep a 2-liter container with a lid on the counter and empty it every two days. Not every day — every two days, because a full container is easier to carry out and I stop resenting the trip. Inside it, I layer a handful of shredded paper at the bottom. That absorbs the liquid that would otherwise turn into the bin smell everyone complains about.
When I carry it out, I follow one rule: scraps go in, browns go on top. Always cover the fresh material. This is the single best defense against fruit flies, and it takes four seconds.
How to make compost in 7 days
You can, in theory. In practice, the seven-day method requires three conditions most households cannot meet: a pile of at least one cubic meter, material shredded to under an inch, and turning every single day with a temperature above 55°C throughout.
The Berkeley method gets close to this. I tried it in a 1-cubic-meter bin with two bags of shredded leaves I had collected in autumn and a steady supply of coffee grounds from a café down the street. It did not finish in seven days. It finished in about three and a half weeks, which is still four times faster than my cold pile. The honest version of "compost in 7 days" is "compost fast if you have volume, patience for daily turning, and shredded material." If you have a small bin on a balcony, skip this and aim for two months.
Troubleshooting the problems that make people quit
Nearly every abandoned compost pile died from one of five problems. All five have the same kind of fix.
It smells like rot
Anaerobic conditions. Too wet, too green, not enough air. Add browns, turn it, and it will correct within three days. If the smell is genuinely unbearable, spread the pile out in the sun for a day before rebuilding it.
Fruit flies and wasps
Exposed food scraps. Bury every addition under at least two inches of brown material. If they are already established, stop adding greens for a week and turn the top layer in. Wasps are a sign the pile is too dry and too sweet — water it and add greens.
Nothing is happening
I will admit I stared at a stalled pile for two months wondering what I had done. The answer was simple: it was bone dry and about the size of a laundry basket. Small piles cannot hold heat. Build it up to at least a cubic meter, water it until it feels like a wrung-out sponge, and turn it once a week.
Composting when you live in an apartment
A traditional pile is off the table without outdoor space, but the alternatives are genuinely good.
Vermicomposting is the best option for most people in flats. A bin roughly the size of a storage crate sits under the sink, holds around a thousand worms, and processes about half a kilo of scraps per week. It produces no smell when managed correctly, which surprises everyone. Mine has been running for four years, and I have never had a complaint from a neighbor or a landlord.
Bokashi is the other route. You ferment scraps in a sealed bucket with a bran inoculated with effective microorganisms, then either bury the result or add it to a traditional pile. It handles meat, fish and dairy, which worm bins cannot. Downside: it is not finished compost, and you still need somewhere for the fermented material to go.
One more thing worth checking before you invest in anything: local rules vary enormously. Some municipalities offer free countertop collection bins and weekly pickup. Others have bylaws about the placement and size of outdoor piles. A five-minute look at your council's waste page has saved me from buying equipment twice.
What you should actually do this weekend
Start smaller than feels satisfying. Get a 2-liter container for the kitchen, find a spot on bare soil where you can build roughly three feet by three feet, and collect your first bag of dry leaves or shredded cardboard before you add a single scrap. The pile that failed on me was the one I built in a hurry with nothing but kitchen waste and optimism.
The number that stays with me is not the 40% I stopped sending to landfill. It is that after the first year, my bin never smelled again — not once. The system stopped being a chore and became just another thing the house does, like the fridge humming.
Your first batch will probably go slightly wrong. Mine did, twice. The difference between people who compost and people who tried composting is almost never skill. It is whether they were still paying attention in week six.